

You got KYC in the UK and are worried about how to solve it?
Here it is:
You received the following notification:

And after some time, you received the following one:

Now, when you go to the account info page, you will find “Identity Information” highlighted in red, along with a red exclamation mark next to the “Business Information” section.
As you click on the “Identity Information” text link, the page will open with fields for Business and Primary Contact Information.
So, let’s start with the Business Information section:
Fill in the fields as follows:
- Business Name: exactly as it appears in the company incorporation document (I will explain later where to get it)
- Company Registration Number: exactly as it appears in the company incorporation document.
- Registration Extract: If you are uploading the company incorporation document, then select “Proof of Registration” from the dropdown.
- Now, download the incorporation document:
- Go to the Companies House website: https://find-and-update.company-information.service.gov.uk/.
- In the field “Enter company name, number, or officer name,” search for your company. You will see the results, open your company’s page.
- There, go to the Filing History section and download the relevant document, as this is where the company incorporation information is available.
- Upload this document under the “Business Extract” section.
- Registered Business Address: Enter the exact address listed in the UK Companies House database, which you can also find in the document you downloaded above.
- Proof of Address: A bank statement (PDF) will work as proof of address. It should be issued within the last 180 days and must show the exact address you provided to Amazon under your company name.
- Check the box confirming that the primary operating address is the same (if you are doing FBA and the director is a UK resident).
- Here, provide the phone number and verify it:
After saving this section, the Business Information section will be complete. Now, let’s move on to the Primary Contact Information:
Primary Contact Information Section:
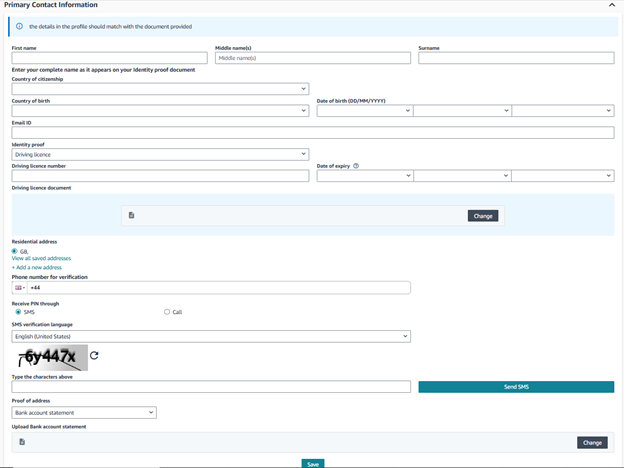
- Name, Country of Citizenship, Country of Birth, and Date of Birth: Enter these details exactly as they appear on the primary contact’s ID document. Make sure the First Name, Middle Name, and Last Name match the ID precisely. Provide the Country of Citizenship, Country of Birth, and Date of Birth according to the primary contact’s ID document.
- Email ID Section: Provide the email address you used (or want to use) to create your Amazon account.
- Identity Proof Section: Here, you need to upload the ID document along with its number and expiry date. For example, in the case of a driving license, upload the document and enter the details exactly as they appear on the primary contact’s ID.
- If you are uploading a driving license, upload the front and back images separately in JPG format.
- Provide the residential address exactly as it appears on the ID document.
- Phone Number Verification Section: Provide the primary contact’s phone number and verify it.
- Proof of Address: Upload a document that confirms the address you provided in this section. It must be recent (within the last 180 days).
After saving this section, the Primary Contact Information section is complete.
Point of Contact / Beneficiary Section: If there is more than one beneficial owner of the business, provide their information. If not, select “Yes” and proceed.

Afterward, click the “Submit for Verification” button. Amazon will then begin reviewing your information. Once the verification is complete, Amazon will notify you via email and/or through the notification section in Seller Central.
I hope this helps you get your account verified. If you have any questions, feel free to contact “Profit Systems.”